為 Spring Boot 專案新增資料庫支援
這是 Spring Boot 和 Kotlin 入門教學的第三部分。在繼續之前,請確保您已完成之前的步驟:
![]() 使用 Kotlin 建立 Spring Boot 專案
使用 Kotlin 建立 Spring Boot 專案![]() 將資料類別新增至 Spring Boot 專案
將資料類別新增至 Spring Boot 專案![]() 為 Spring Boot 專案新增資料庫支援
為 Spring Boot 專案新增資料庫支援![]() 使用 Spring Data CrudRepository 進行資料庫存取
使用 Spring Data CrudRepository 進行資料庫存取
在本教學的此部分中,您將使用 JDBC 新增資料庫並將其設定到您的專案中。在 JVM 應用程式中,您可以使用 JDBC 與資料庫互動。
為了方便起見,Spring Framework 提供了 JdbcTemplate 類別,可簡化 JDBC 的使用並幫助避免常見錯誤。
新增資料庫支援
在基於 Spring Framework 的應用程式中,常見的做法是在所謂的 服務 (service) 層中實作資料庫存取邏輯 - 這是商業邏輯所在的位置。
在 Spring 中,您應該使用 @Service 註解標記類別,以表示該類別屬於應用程式的服務層。
在本應用程式中,您將為此目的建立 MessageService 類別。
在同一個套件中,建立 MessageService.kt 檔案和 MessageService 類別,如下所示:
// MessageService.kt
package demo

import org.springframework.stereotype.Service
import org.springframework.jdbc.core.JdbcTemplate
import java.util.*

@Service
class MessageService(private val db: JdbcTemplate) {
    fun findMessages(): List<Message> = db.query("select * from messages") { response, _ `->`
        Message(response.getString("id"), response.getString("text"))
    }

    fun save(message: Message): Message {
        db.update(
            "insert into messages values ( ?, ? )",
            message.id, message.text
        )
        return message
    }
}
建構子引數和依賴注入 – (private val db: JdbcTemplate)
Kotlin 中的類別具有主要建構子 (primary constructor)。它也可以有一個或多個 次要建構子 (secondary constructors)。
主要建構子 (primary constructor) 是類別標頭的一部分,它位於類別名稱和可選類型參數之後。在我們的例子中,建構子是 (val db: JdbcTemplate)。
val db: JdbcTemplate 是建構子的引數:
@Service
class MessageService(private val db: JdbcTemplate)
尾隨 Lambda (trailing lambda) 和 SAM 轉換 (SAM conversion)
findMessages() 函數呼叫 JdbcTemplate 類別的 query() 函數。query() 函數接受兩個引數:一個作為 String 實例的 SQL 查詢,以及一個回呼 (callback),它將對應每一列的物件:
db.query("...", RowMapper { ... } )
```<br/>
<p>
`RowMapper` 介面只宣告一個方法,因此可以透過省略介面名稱的 Lambda 運算式來實作它。Kotlin 編譯器知道 Lambda 運算式需要轉換成的介面,因為您將其用作函數呼叫的參數。這被稱為 <a href="java-interop#sam-conversions">Kotlin 中的 SAM 轉換 (SAM conversion)</a>:
</p>
```sql
db.query("...", { ... } )
```<br/>
<p>
在 SAM 轉換 (SAM conversion) 之後,查詢函數最終有兩個引數:第一個位置的 String 和最後一個位置的 Lambda 運算式。根據 Kotlin 慣例,如果函數的最後一個參數是一個函數,則可以將作為相應引數傳遞的 Lambda 運算式放置在括號之外。這種語法也稱為 <a href="lambdas#passing-trailing-lambdas">尾隨 Lambda (trailing lambda)</a>:
</p>
```sql
db.query("...") { ... }
未使用 Lambda 引數的底線
對於具有多個參數的 Lambda,您可以使用底線 _ 字元來替換您不使用的參數名稱。
因此,查詢函數呼叫的最終語法如下所示:
db.query("select * from messages") { response, _ `->`
    Message(response.getString("id"), response.getString("text"))
}
更新 MessageController 類別
更新 MessageController.kt 以使用新的 MessageService 類別:
// MessageController.kt
package demo

import org.springframework.http.ResponseEntity
import org.springframework.web.bind.annotation.GetMapping
import org.springframework.web.bind.annotation.PostMapping
import org.springframework.web.bind.annotation.RequestBody
import org.springframework.web.bind.annotation.RequestMapping
import org.springframework.web.bind.annotation.RestController
import java.net.URI

@RestController
@RequestMapping("/")
class MessageController(private val service: MessageService) {
    @GetMapping
    fun listMessages() = service.findMessages()

    @PostMapping
    fun post(@RequestBody message: Message): ResponseEntity<Message> {
        val savedMessage = service.save(message)
        return ResponseEntity.created(URI("/${savedMessage.id}")).body(savedMessage)
    }
}
@PostMapping 註解
負責處理 HTTP POST 請求的方法需要使用 @PostMapping 註解進行註解。為了能夠將作為 HTTP Body 內容傳送的 JSON 轉換為物件,您需要對方法引數使用 @RequestBody 註解。感謝應用程式類別路徑 (classpath) 中有 Jackson 函式庫,轉換會自動發生。
ResponseEntity
ResponseEntity 表示整個 HTTP 回應:狀態碼、標頭和本文。
使用 created() 方法,您可以設定回應狀態碼 (201) 並設定位置標頭,以指示已建立資源的內容路徑。
更新 MessageService 類別
Message 類別的 id 被宣告為可為空字串 (nullable String):
data class Message(val id: String?, val text: String)
但是,將 null 作為資料庫中的 id 值儲存是不正確的:您需要妥善處理這種情況。
更新 MessageService.kt 檔案的程式碼,以便在將訊息儲存在資料庫中時,當 id 為 null 時產生一個新值:
// MessageService.kt
package demo

import org.springframework.stereotype.Service
import org.springframework.jdbc.core.JdbcTemplate
import org.springframework.jdbc.core.query
import java.util.UUID

@Service
class MessageService(private val db: JdbcTemplate) {
    fun findMessages(): List<Message> = db.query("select * from messages") { response, _ `->`
        Message(response.getString("id"), response.getString("text"))
    }

    fun save(message: Message): Message {
        val id = message.id ?: UUID.randomUUID().toString() // Generate new id if it is null
        db.update(
            "insert into messages values ( ?, ? )",
            id, message.text
        )
        return message.copy(id = id) // Return a copy of the message with the new id
   }
}
Elvis 運算子 – ?:
程式碼 message.id ?: UUID.randomUUID().toString() 使用 Elvis 運算子(非空值則返回,否則簡寫) ?:。如果 ?: 左側的運算式不是 null,則 Elvis 運算子會傳回它;否則,它會傳回右側的運算式。請注意,只有當左側為 null 時,才會評估右側的運算式。
應用程式程式碼已準備好與資料庫一起使用。現在需要設定資料來源。
設定資料庫
在應用程式中設定資料庫:
-
在
src/main/resources目錄中建立schema.sql檔案。它將儲存資料庫物件定義:
-
使用以下程式碼更新
src/main/resources/schema.sql檔案:-- schema.sql
CREATE TABLE IF NOT EXISTS messages (
id VARCHAR(60) PRIMARY KEY,
text VARCHAR NOT NULL
);它會建立具有兩欄的
messages資料表:id和text。資料表結構與Message類別的結構相符。 -
開啟位於
src/main/resources資料夾中的application.properties檔案,並新增以下應用程式屬性:spring.application.name=demo
spring.datasource.driver-class-name=org.h2.Driver
spring.datasource.url=jdbc:h2:file:./data/testdb
spring.datasource.username=name
spring.datasource.password=password
spring.sql.init.schema-locations=classpath:schema.sql
spring.sql.init.mode=always這些設定會為 Spring Boot 應用程式啟用資料庫。
請參閱 Spring 文件 中的常見應用程式屬性完整清單。
透過 HTTP 請求將訊息新增至資料庫
您應該使用 HTTP 用戶端來使用先前建立的端點。在 IntelliJ IDEA 中,使用內嵌的 HTTP 用戶端:
-
執行應用程式。應用程式啟動並執行後,您可以執行 POST 請求以將訊息儲存在資料庫中。
-
在專案根資料夾中建立
requests.http檔案,並新增以下 HTTP 請求:### Post "Hello!"
POST http://localhost:8080/
Content-Type: application/json
{
"text": "Hello!"
}
### Post "Bonjour!"
POST http://localhost:8080/
Content-Type: application/json
{
"text": "Bonjour!"
}
### Post "Privet!"
POST http://localhost:8080/
Content-Type: application/json
{
"text": "Privet!"
}
### Get all the messages
GET http://localhost:8080/ -
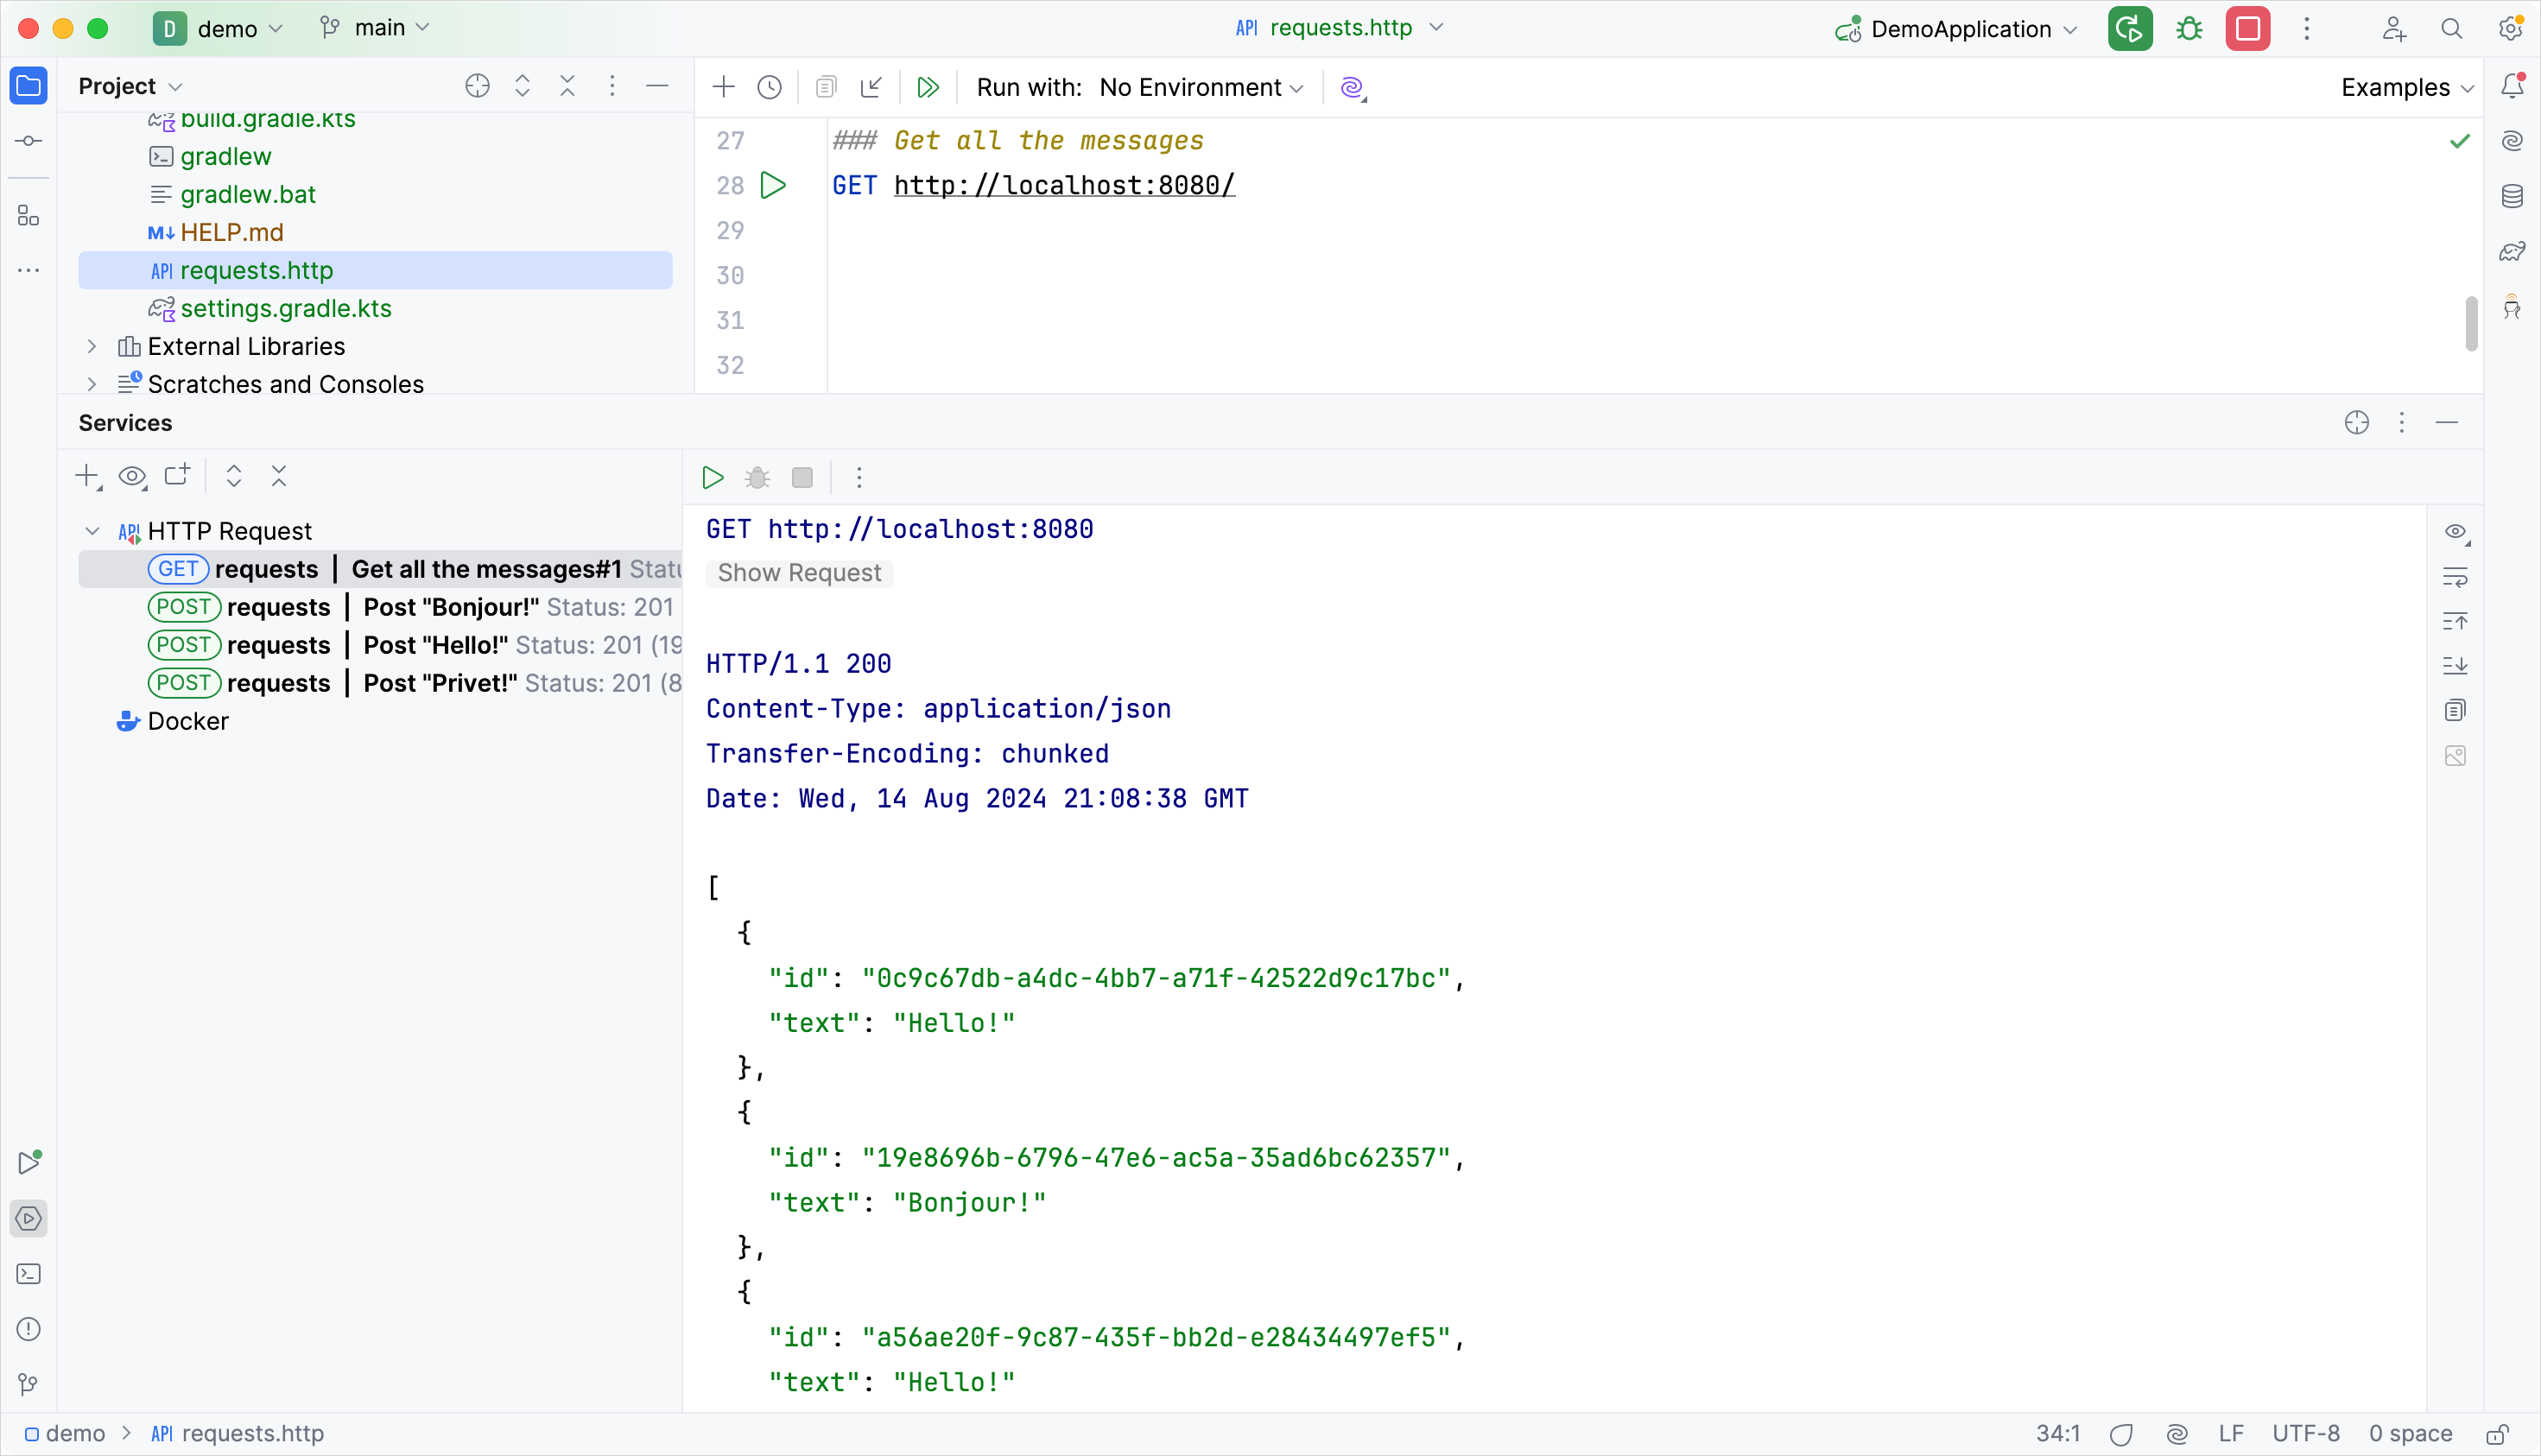
執行所有 POST 請求。使用請求宣告旁邊溝槽中的綠色 執行 (Run) 圖示。 這些請求會將文字訊息寫入資料庫:

-
執行 GET 請求,並在 執行 (Run) 工具視窗中查看結果:
執行請求的替代方法
您也可以使用任何其他 HTTP 用戶端或 cURL 命令列工具。例如,在 終端機中執行以下命令以獲得相同的結果:
curl -X POST --location "http://localhost:8080" -H "Content-Type: application/json" -d "{ \"text\": \"Hello!\" }"

curl -X POST --location "http://localhost:8080" -H "Content-Type: application/json" -d "{ \"text\": \"Bonjour!\" }"

curl -X POST --location "http://localhost:8080" -H "Content-Type: application/json" -d "{ \"text\": \"Privet!\" }"

curl -X GET --location "http://localhost:8080"
依 ID 檢索訊息
擴充應用程式的功能以依 ID 檢索個別訊息。
-
在
MessageService類別中,新增新函數findMessageById(id: String)以依 ID 檢索個別訊息:// MessageService.kt
package demo
import org.springframework.stereotype.Service
import org.springframework.jdbc.core.JdbcTemplate
import org.springframework.jdbc.core.query
import java.util.*
@Service
class MessageService(private val db: JdbcTemplate) {
fun findMessages(): List<Message> = db.query("select * from messages") { response, _ `->`
Message(response.getString("id"), response.getString("text"))
}
fun findMessageById(id: String): Message? = db.query("select * from messages where id = ?", id) { response, _ `->`
Message(response.getString("id"), response.getString("text"))
}.singleOrNull()
fun save(message: Message): Message {
val id = message.id ?: UUID.randomUUID().toString() // Generate new id if it is null
db.update(
"insert into messages values ( ?, ? )",
id, message.text
)
return message.copy(id = id) // Return a copy of the message with the new id
}
}用於依 ID 提取訊息的
.query()函數是由 Spring Framework 提供的 Kotlin 擴充函數。 它需要額外的匯入import org.springframework.jdbc.core.query,如上面的程式碼所示。 -
將具有
id參數的新index(...)函數新增至MessageController類別:// MessageController.kt
package demo
import org.springframework.http.ResponseEntity
import org.springframework.web.bind.annotation.GetMapping
import org.springframework.web.bind.annotation.PathVariable
import org.springframework.web.bind.annotation.PostMapping
import org.springframework.web.bind.annotation.RequestBody
import org.springframework.web.bind.annotation.RequestMapping
import org.springframework.web.bind.annotation.RestController
import java.net.URI
@RestController
@RequestMapping("/")
class MessageController(private val service: MessageService) {
@GetMapping
fun listMessages() = ResponseEntity.ok(service.findMessages())
@PostMapping
fun post(@RequestBody message: Message): ResponseEntity<Message> {
val savedMessage = service.save(message)
return ResponseEntity.created(URI("/${savedMessage.id}")).body(savedMessage)
}
@GetMapping("/{id}")
fun getMessage(@PathVariable id: String): ResponseEntity<Message> =
service.findMessageById(id).toResponseEntity()
private fun Message?.toResponseEntity(): ResponseEntity<Message> =
// If the message is null (not found), set response code to 404
this?.let { ResponseEntity.ok(it) } ?: ResponseEntity.notFound().build()
}
從內容路徑檢索值
訊息 id 是由 Spring Framework 從內容路徑檢索的,因為您使用 @GetMapping("/{id}") 註解對新函數進行註解。透過使用 @PathVariable 註解函數引數,您可以告訴 Framework 使用檢索到的值作為函數引數。新函數會呼叫 MessageService 以依 ID 檢索個別訊息。
參數清單中 vararg 引數的位置
query() 函數採用三個引數:
id,它是 String 類型的參數RowMapper 實例由 Lambda 運算式實作query() 函數的第二個參數宣告為可變引數 (vararg)。在 Kotlin 中,可變引數參數的位置不一定要是參數清單中的最後一個。
具有可為空接收者的擴充函數
可以使用可為空接收者類型來定義擴充。如果接收者是 null,則 this 也是 null。因此,在定義具有可為空接收者類型的擴充時,建議在函數主體內執行 this == null 檢查。
您也可以使用安全呼叫運算子 (safe invocation operator) (?.) 來執行空值檢查,如上面的 toResponseBody 函數中所示:
this?.let { ResponseEntity.ok(it) }
ResponseEntity
ResponseEntity 表示 HTTP 回應,包括狀態碼、標頭和本文。它是一個泛型包裝函式,可讓您將自訂的 HTTP 回應傳送回用戶端,並更好地控制內容。
以下是應用程式的完整程式碼:
// DemoApplication.kt
package demo

import org.springframework.boot.autoconfigure.SpringBootApplication
import org.springframework.boot.runApplication

@SpringBootApplication
class DemoApplication

fun main(args: Array<String>) {
   runApplication<DemoApplication>(*args)
}
// Message.kt
package demo

data class Message(val id: String?, val text: String)
// MessageService.kt
package demo

import org.springframework.stereotype.Service
import org.springframework.jdbc.core.JdbcTemplate
import org.springframework.jdbc.core.query
import java.util.*

@Service
class MessageService(private val db: JdbcTemplate) {
    fun findMessages(): List<Message> = db.query("select * from messages") { response, _ `->`
        Message(response.getString("id"), response.getString("text"))
    }

    fun findMessageById(id: String): Message? = db.query("select * from messages where id = ?", id) { response, _ `->`
        Message(response.getString("id"), response.getString("text"))
    }.singleOrNull()

    fun save(message: Message): Message {
        val id = message.id ?: UUID.randomUUID().toString()
        db.update(
            "insert into messages values ( ?, ? )",
            id, message.text
        )
        return message.copy(id = id)
    }
}
// MessageController.kt
package demo

import org.springframework.http.ResponseEntity
import org.springframework.web.bind.annotation.GetMapping
import org.springframework.web.bind.annotation.PathVariable
import org.springframework.web.bind.annotation.PostMapping
import org.springframework.web.bind.annotation.RequestBody
import org.springframework.web.bind.annotation.RequestMapping
import org.springframework.web.bind.annotation.RestController
import java.net.URI

@RestController
@RequestMapping("/")
class MessageController(private val service: MessageService) {
    @GetMapping
    fun listMessages() = ResponseEntity.ok(service.findMessages())

    @PostMapping
    fun post(@RequestBody message: Message): ResponseEntity<Message> {
        val savedMessage = service.save(message)
        return ResponseEntity.created(URI("/${savedMessage.id}")).body(savedMessage)
    }

    @GetMapping("/{id}")
    fun getMessage(@PathVariable id: String): ResponseEntity<Message> =
        service.findMessageById(id).toResponseEntity()

    private fun Message?.toResponseEntity(): ResponseEntity<Message> =
        this?.let { ResponseEntity.ok(it) } ?: ResponseEntity.notFound().build()
}
執行應用程式
Spring 應用程式已準備好執行:
-
再次執行應用程式。
-
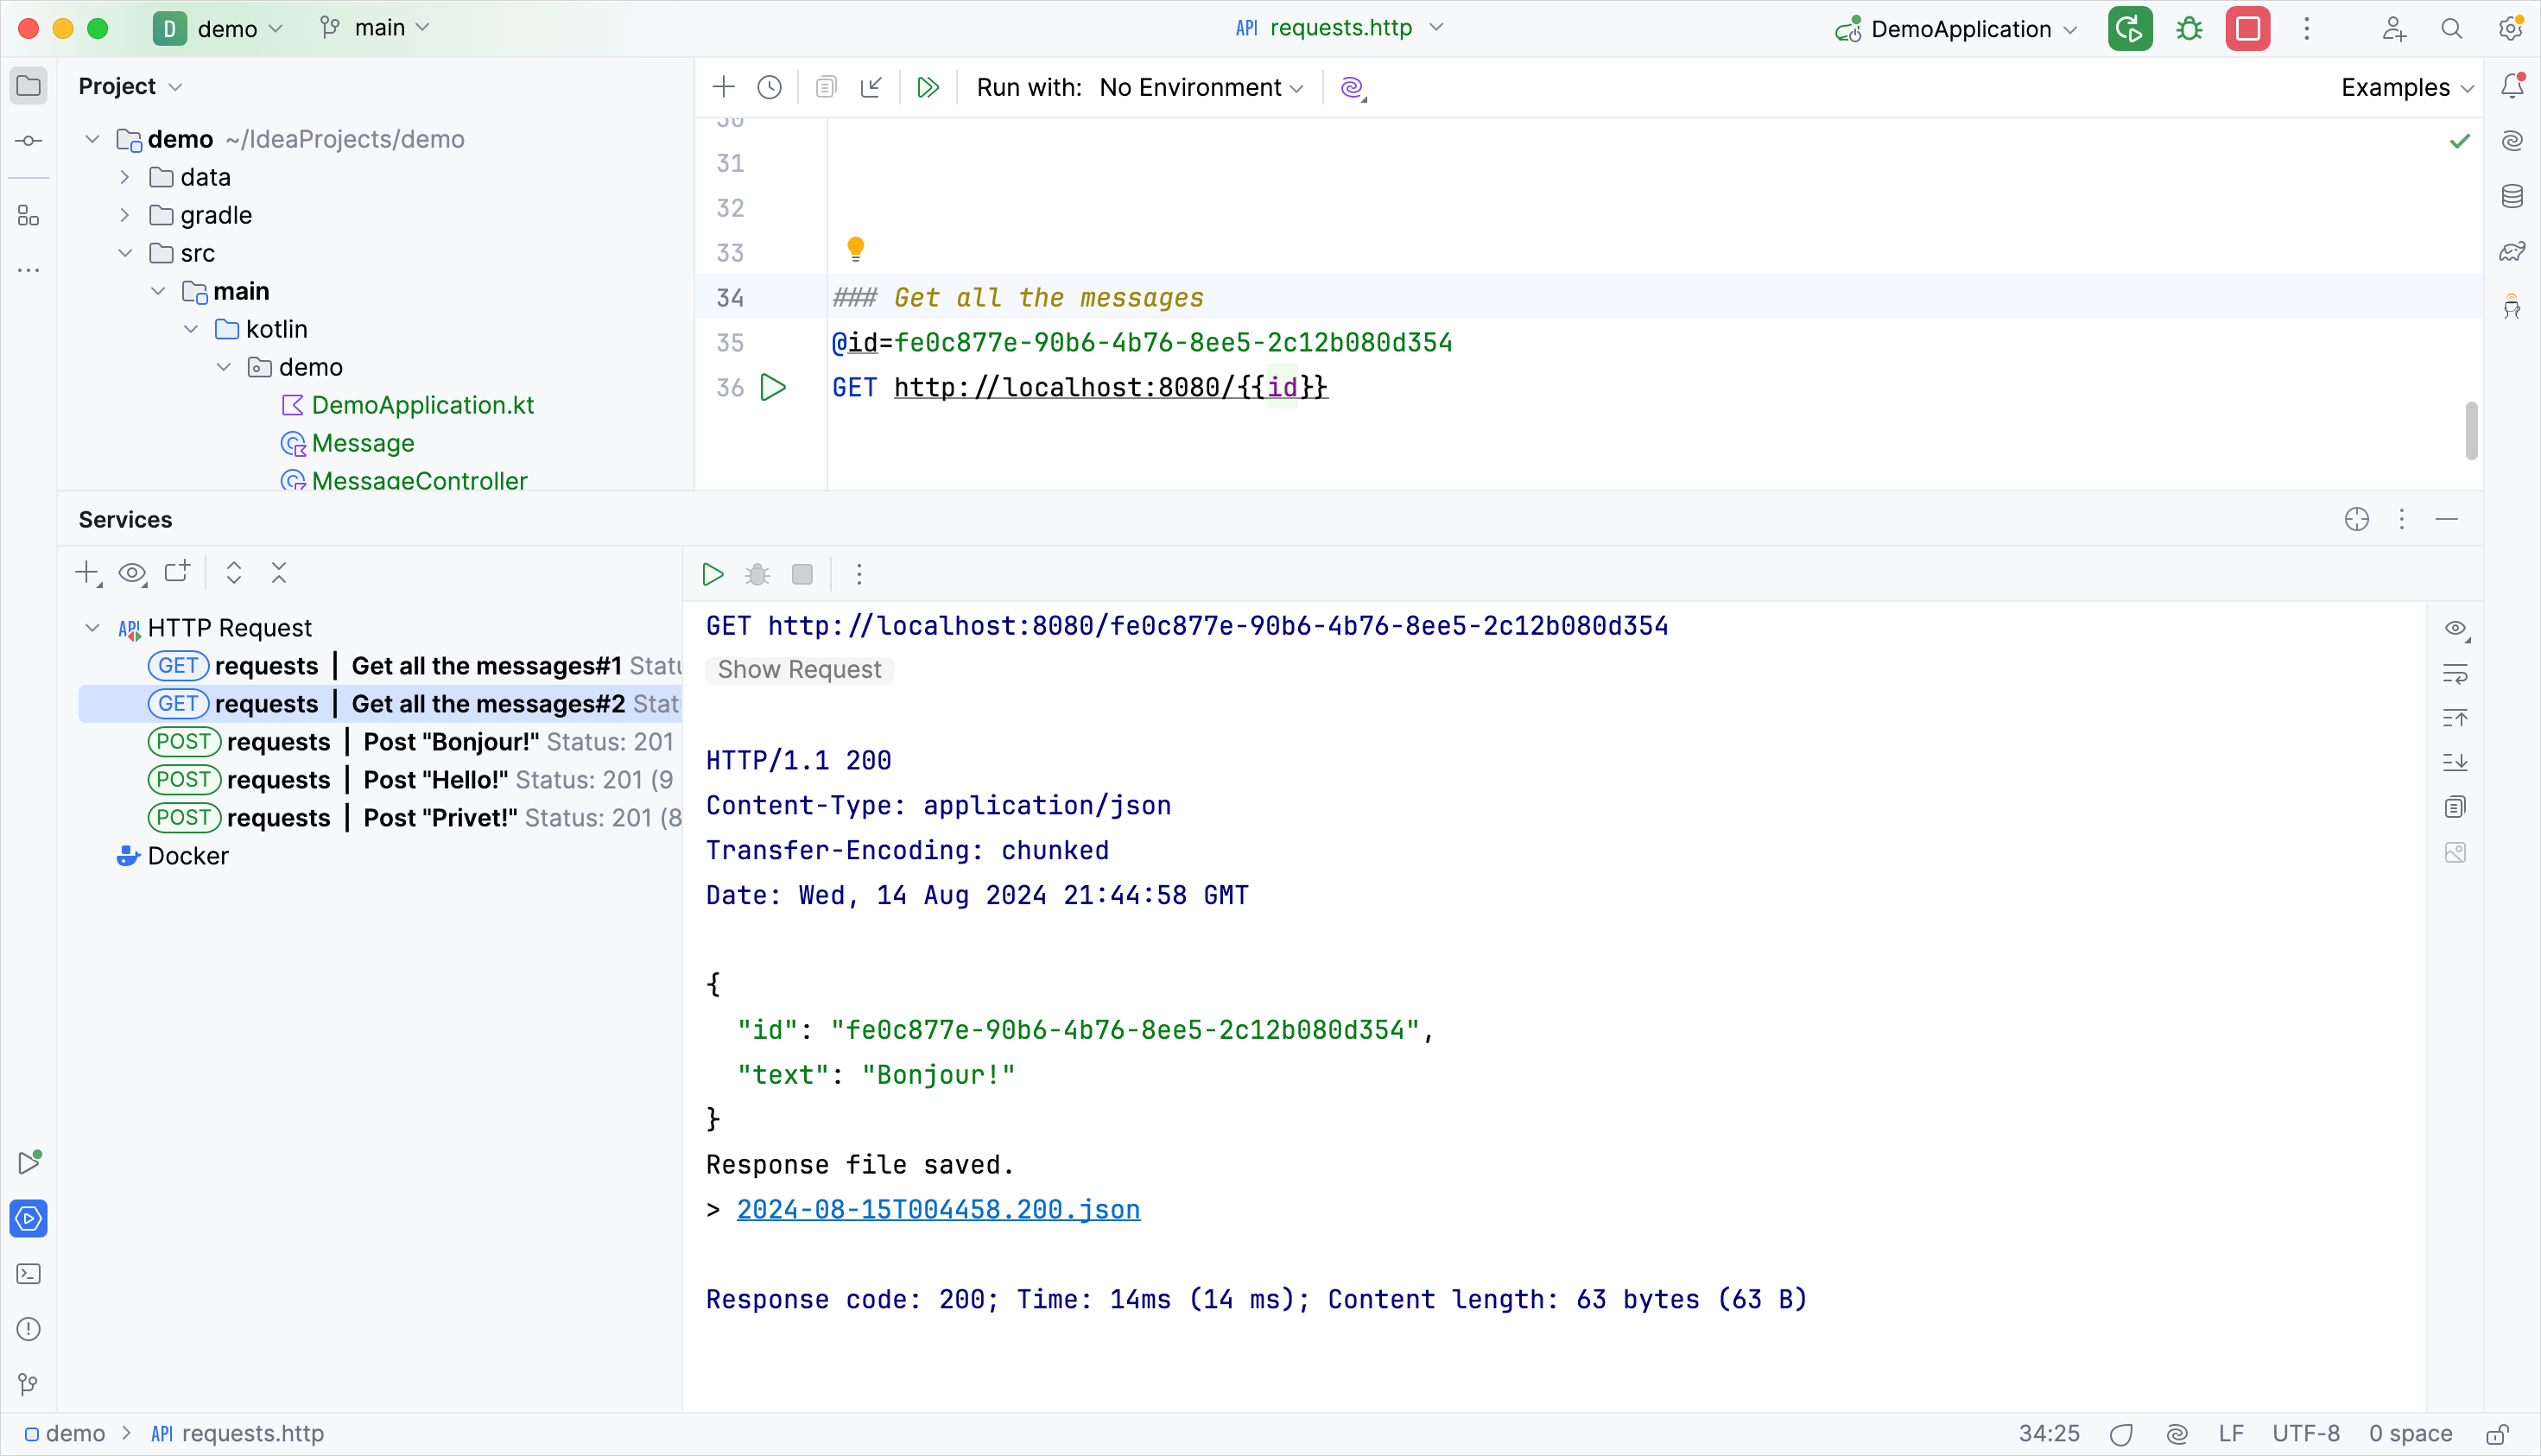
開啟
requests.http檔案並新增新的 GET 請求:### Get the message by its id
GET http://localhost:8080/id -
執行 GET 請求以從資料庫檢索所有訊息。
-
在 執行 (Run) 工具視窗中,複製其中一個 ID 並將其新增至請求,如下所示:
### Get the message by its id
GET http://localhost:8080/f16c1d2e-08dc-455c-abfe-68440229b84f
請將您的訊息 ID 放入上面提到的位置,而不是上面提及的內容。
-
執行 GET 請求,並在 執行 (Run) 工具視窗中查看結果:
下一步
最後一個步驟將向您展示如何使用 Spring Data 更常見的資料庫連線。