Spring Bootプロジェクトへのデータベースサポートの追加
これは、Spring BootとKotlin入門チュートリアルの第3部です。先に進む前に、以下の前の手順を完了していることを確認してください。
![]() KotlinでSpring Bootプロジェクトを作成する
KotlinでSpring Bootプロジェクトを作成する![]() Spring Bootプロジェクトにデータクラスを追加する
Spring Bootプロジェクトにデータクラスを追加する![]() Spring Bootプロジェクトにデータベースサポートを追加する
Spring Bootプロジェクトにデータベースサポートを追加する![]() データベースアクセスにSpring Data CrudRepositoryを使用する
データベースアクセスにSpring Data CrudRepositoryを使用する
このチュートリアルでは、JDBCを使用してデータベースをプロジェクトに追加し、構成します。JVMアプリケーションでは、JDBCを使用してデータベースとやり取りします。
便宜上、Spring FrameworkはJDBCの使用を簡素化し、一般的なエラーを回避するのに役立つJdbcTemplateクラスを提供します。
データベースサポートを追加する
Spring Frameworkベースのアプリケーションにおける一般的なプラクティスは、いわゆる service レイヤー内でデータベースアクセスロジックを実装することです。これはビジネスロジックが存在する場所です。
Springでは、クラスがアプリケーションのサービスレイヤーに属することを示すために、@Serviceアノテーションでクラスをマークする必要があります。
このアプリケーションでは、この目的のためにMessageServiceクラスを作成します。
同じパッケージ内に、MessageService.ktファイルを作成し、次のようにMessageServiceクラスを作成します。
// MessageService.kt
package demo

import org.springframework.stereotype.Service
import org.springframework.jdbc.core.JdbcTemplate
import java.util.*

@Service
class MessageService(private val db: JdbcTemplate) {
    fun findMessages(): List<Message> = db.query("select * from messages") { response, _ `->`
        Message(response.getString("id"), response.getString("text"))
    }

    fun save(message: Message): Message {
        db.update(
            "insert into messages values ( ?, ? )",
            message.id, message.text
        )
        return message
    }
}
コンストラクタ引数と依存性注入 – (private val db: JdbcTemplate)
Kotlinのクラスには、プライマリコンストラクタがあります。また、1つ以上のセカンダリコンストラクタを持つこともできます。
プライマリコンストラクタはクラスヘッダーの一部であり、クラス名とオプションの型パラメータの後に記述します。この場合、コンストラクタは(val db: JdbcTemplate)です。
val db: JdbcTemplateはコンストラクタの引数です。
@Service
class MessageService(private val db: JdbcTemplate)
末尾のラムダとSAM変換
findMessages()関数は、JdbcTemplateクラスのquery()関数を呼び出します。query()関数は、StringインスタンスとしてのSQLクエリと、行ごとに1つのオブジェクトをマップするコールバックという2つの引数を取ります。
db.query("...", RowMapper { ... } )
```<br/>
<p>
`RowMapper`インターフェースは1つのメソッドのみを宣言するため、インターフェース名を省略してラムダ式で実装できます。Kotlinコンパイラは、関数呼び出しのパラメータとして使用するため、ラムダ式が変換される必要のあるインターフェースを認識します。これは<a href="java-interop#sam-conversions">KotlinのSAM変換</a>として知られています。
</p>
```sql
db.query("...", { ... } )
```<br/>
<p>
SAM変換後、query関数は、最初の位置にString、最後の位置にラムダ式という2つの引数で終わります。Kotlinの規則に従い、関数の最後のパラメータが関数の場合、対応する引数として渡されるラムダ式は、括弧の外に配置できます。このような構文は、<a href="lambdas#passing-trailing-lambdas">末尾のラムダ</a>とも呼ばれます。
</p>
```sql
db.query("...") { ... }
未使用のラムダ引数に対するアンダースコア
複数のパラメータを持つラムダの場合、アンダースコア_文字を使用して、使用しないパラメータの名前を置き換えることができます。
したがって、query関数呼び出しの最終的な構文は次のようになります。
db.query("select * from messages") { response, _ `->`
    Message(response.getString("id"), response.getString("text"))
}
MessageControllerクラスを更新する
新しいMessageServiceクラスを使用するようにMessageController.ktを更新します。
// MessageController.kt
package demo

import org.springframework.http.ResponseEntity
import org.springframework.web.bind.annotation.GetMapping
import org.springframework.web.bind.annotation.PostMapping
import org.springframework.web.bind.annotation.RequestBody
import org.springframework.web.bind.annotation.RequestMapping
import org.springframework.web.bind.annotation.RestController
import java.net.URI

@RestController
@RequestMapping("/")
class MessageController(private val service: MessageService) {
    @GetMapping
    fun listMessages() = service.findMessages()

    @PostMapping
    fun post(@RequestBody message: Message): ResponseEntity<Message> {
        val savedMessage = service.save(message)
        return ResponseEntity.created(URI("/${savedMessage.id}")).body(savedMessage)
    }
}
@PostMappingアノテーション
HTTP POSTリクエストの処理を担当するメソッドには、@PostMappingアノテーションを付ける必要があります。HTTP Bodyコンテンツとして送信されたJSONをオブジェクトに変換できるようにするには、メソッド引数に@RequestBodyアノテーションを使用する必要があります。アプリケーションのクラスパスにJacksonライブラリがあるため、変換は自動的に行われます。
ResponseEntity
ResponseEntityは、ステータスコード、ヘッダー、およびボディを含むHTTPレスポンス全体を表します。
created()メソッドを使用すると、レスポンスステータスコード(201)を設定し、作成されたリソースのコンテキストパスを示すlocationヘッダーを設定できます。
MessageServiceクラスを更新する
Messageクラスのidは、nullable Stringとして宣言されました。
data class Message(val id: String?, val text: String)
ただし、nullをid値としてデータベースに格納するのは正しくありません。この状況を適切に処理する必要があります。
データベースにメッセージを格納する際に、idがnullの場合に新しい値を生成するように、MessageService.ktファイルのコードを更新します。
// MessageService.kt
package demo

import org.springframework.stereotype.Service
import org.springframework.jdbc.core.JdbcTemplate
import org.springframework.jdbc.core.query
import java.util.UUID

@Service
class MessageService(private val db: JdbcTemplate) {
    fun findMessages(): List<Message> = db.query("select * from messages") { response, _ `->`
        Message(response.getString("id"), response.getString("text"))
    }

    fun save(message: Message): Message {
        val id = message.id ?: UUID.randomUUID().toString() // Generate new id if it is null
        db.update(
            "insert into messages values ( ?, ? )",
            id, message.text
        )
        return message.copy(id = id) // Return a copy of the message with the new id
   }
}
Elvis演算子 – ?:
コードmessage.id ?: UUID.randomUUID().toString()は、Elvis演算子(if-not-null-elseの省略形)?:を使用しています。?:の左側の式がnullでない場合、Elvis演算子はそれを返します。それ以外の場合は、右側の式を返します。右側の式は、左側がnullの場合にのみ評価されることに注意してください。
アプリケーションコードは、データベースを操作する準備ができました。次に、データソースを構成する必要があります。
データベースを構成する
アプリケーションでデータベースを構成します。
-
src/main/resourcesディレクトリにschema.sqlファイルを作成します。これにより、データベースオブジェクトの定義が格納されます。
-
次のコードを使用して
src/main/resources/schema.sqlファイルを更新します。-- schema.sql
CREATE TABLE IF NOT EXISTS messages (
id VARCHAR(60) PRIMARY KEY,
text VARCHAR NOT NULL
);これにより、
idとtextの2つの列を持つmessagesテーブルが作成されます。テーブル構造はMessageクラスの構造と一致します。 -
src/main/resourcesフォルダーにあるapplication.propertiesファイルを開き、次のアプリケーションプロパティを追加します。spring.application.name=demo
spring.datasource.driver-class-name=org.h2.Driver
spring.datasource.url=jdbc:h2:file:./data/testdb
spring.datasource.username=name
spring.datasource.password=password
spring.sql.init.schema-locations=classpath:schema.sql
spring.sql.init.mode=alwaysこれらの設定により、Spring Bootアプリケーションのデータベースが有効になります。
一般的なアプリケーションプロパティの完全なリストは、Springドキュメントを参照してください。
HTTPリクエストを介してメッセージをデータベースに追加する
以前に作成したエンドポイントを操作するには、HTTPクライアントを使用する必要があります。IntelliJ IDEAでは、埋め込みHTTPクライアントを使用します。
-
アプリケーションを実行します。アプリケーションが起動して実行されたら、POSTリクエストを実行してデータベースにメッセージを格納できます。
-
プロジェクトのルートフォルダーに
requests.httpファイルを作成し、次のHTTPリクエストを追加します。### Post "Hello!"
POST http://localhost:8080/
Content-Type: application/json
{
"text": "Hello!"
}
### Post "Bonjour!"
POST http://localhost:8080/
Content-Type: application/json
{
"text": "Bonjour!"
}
### Post "Privet!"
POST http://localhost:8080/
Content-Type: application/json
{
"text": "Privet!"
}
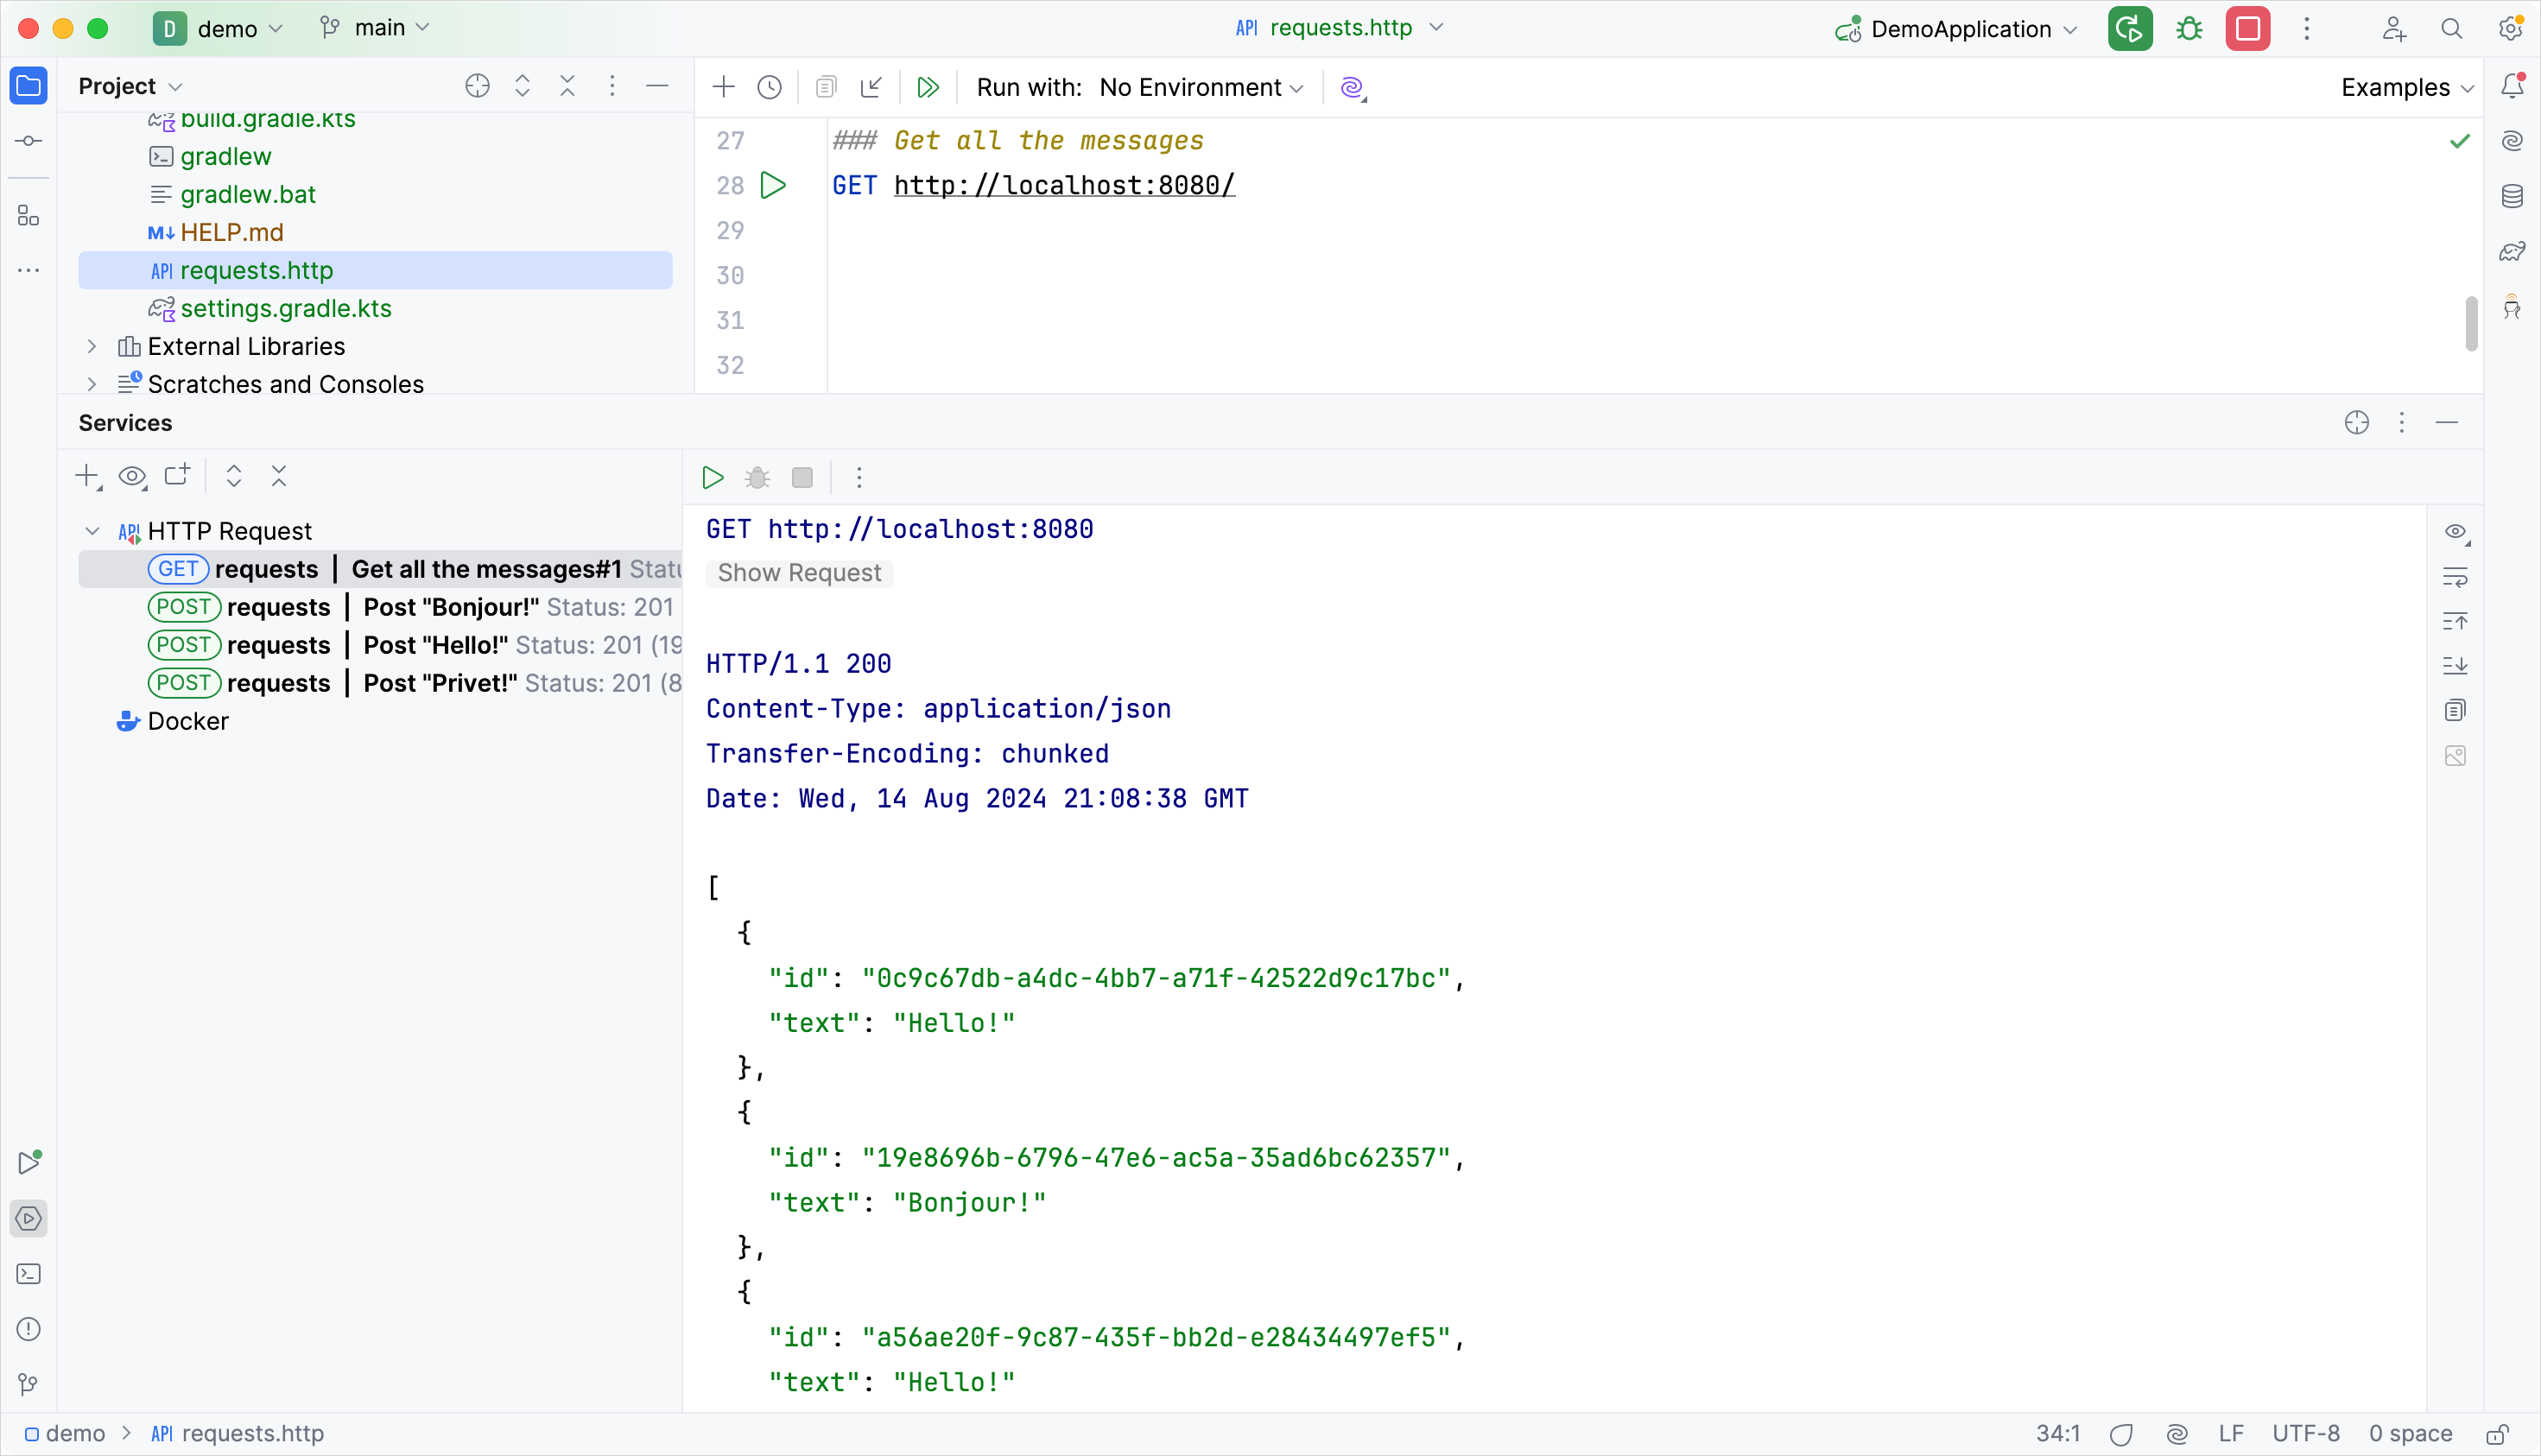
### Get all the messages
GET http://localhost:8080/ -
すべてのPOSTリクエストを実行します。リクエスト宣言の横にあるガターの緑色のRunアイコンを使用します。 これらのリクエストは、テキストメッセージをデータベースに書き込みます。

-
GETリクエストを実行し、Runツールウィンドウで結果を確認します。
リクエストを実行する別の方法
他のHTTPクライアントまたはcURLコマンドラインツールを使用することもできます。たとえば、ターミナルで次のコマンドを実行して、同じ結果を得ることができます。
curl -X POST --location "http://localhost:8080" -H "Content-Type: application/json" -d "{ \"text\": \"Hello!\" }"

curl -X POST --location "http://localhost:8080" -H "Content-Type: application/json" -d "{ \"text\": \"Bonjour!\" }"

curl -X POST --location "http://localhost:8080" -H "Content-Type: application/json" -d "{ \"text\": \"Privet!\" }"

curl -X GET --location "http://localhost:8080"
IDでメッセージを取得する
IDで個々のメッセージを取得するために、アプリケーションの機能を拡張します。
-
MessageServiceクラスで、IDで個々のメッセージを取得するための新しい関数findMessageById(id: String)を追加します。// MessageService.kt
package demo
import org.springframework.stereotype.Service
import org.springframework.jdbc.core.JdbcTemplate
import org.springframework.jdbc.core.query
import java.util.*
@Service
class MessageService(private val db: JdbcTemplate) {
fun findMessages(): List<Message> = db.query("select * from messages") { response, _ `->`
Message(response.getString("id"), response.getString("text"))
}
fun findMessageById(id: String): Message? = db.query("select * from messages where id = ?", id) { response, _ `->`
Message(response.getString("id"), response.getString("text"))
}.singleOrNull()
fun save(message: Message): Message {
val id = message.id ?: UUID.randomUUID().toString() // Generate new id if it is null
db.update(
"insert into messages values ( ?, ? )",
id, message.text
)
return message.copy(id = id) // Return a copy of the message with the new id
}
}IDでメッセージをフェッチするために使用される
.query()関数は、Spring Frameworkによって提供されるKotlin拡張関数です。 上記のコードで示されているように、追加のインポートimport org.springframework.jdbc.core.queryが必要です。 -
MessageControllerクラスに、idパラメータを持つ新しいindex(...)関数を追加します。// MessageController.kt
package demo
import org.springframework.http.ResponseEntity
import org.springframework.web.bind.annotation.GetMapping
import org.springframework.web.bind.annotation.PathVariable
import org.springframework.web.bind.annotation.PostMapping
import org.springframework.web.bind.annotation.RequestBody
import org.springframework.web.bind.annotation.RequestMapping
import org.springframework.web.bind.annotation.RestController
import java.net.URI
@RestController
@RequestMapping("/")
class MessageController(private val service: MessageService) {
@GetMapping
fun listMessages() = ResponseEntity.ok(service.findMessages())
@PostMapping
fun post(@RequestBody message: Message): ResponseEntity<Message> {
val savedMessage = service.save(message)
return ResponseEntity.created(URI("/${savedMessage.id}")).body(savedMessage)
}
@GetMapping("/{id}")
fun getMessage(@PathVariable id: String): ResponseEntity<Message> =
service.findMessageById(id).toResponseEntity()
private fun Message?.toResponseEntity(): ResponseEntity<Message> =
// If the message is null (not found), set response code to 404
this?.let { ResponseEntity.ok(it) } ?: ResponseEntity.notFound().build()
}
コンテキストパスからの値の取得
新しい関数を@GetMapping("/{id}")でアノテーションを付けたため、メッセージidはSpring Frameworkによってコンテキストパスから取得されます。関数引数に@PathVariableでアノテーションを付けることにより、取得した値を関数引数として使用するようにフレームワークに指示します。新しい関数はMessageServiceを呼び出して、IDで個々のメッセージを取得します。
パラメータリスト内のvararg引数の位置
query()関数は、次の3つの引数を受け取ります。
idRowMapperインスタンスquery()関数の2番目のパラメータは、可変引数(vararg)として宣言されています。Kotlinでは、可変引数パラメータの位置は、パラメータリストの最後である必要はありません。
nullableレシーバーを持つ拡張関数
拡張機能は、nullableレシーバー型で定義できます。レシーバーがnullの場合、thisもnullです。したがって、nullableレシーバー型で拡張機能を定義する場合は、関数本体内でthis == nullチェックを実行することをお勧めします。
上記のtoResponseBody関数のように、nullセーフ呼び出し演算子(?.)を使用してnullチェックを実行することもできます。
this?.let { ResponseEntity.ok(it) }
ResponseEntity
ResponseEntityは、ステータスコード、ヘッダー、および本文を含むHTTPレスポンスを表します。これは、コンテンツをより細かく制御して、カスタマイズされたHTTPレスポンスをクライアントに送信できるようにする汎用ラッパーです。
アプリケーションの完全なコードを次に示します。
// DemoApplication.kt
package demo

import org.springframework.boot.autoconfigure.SpringBootApplication
import org.springframework.boot.runApplication

@SpringBootApplication
class DemoApplication

fun main(args: Array<String>) {
   runApplication<DemoApplication>(*args)
}
// Message.kt
package demo

data class Message(val id: String?, val text: String)
// MessageService.kt
package demo

import org.springframework.stereotype.Service
import org.springframework.jdbc.core.JdbcTemplate
import org.springframework.jdbc.core.query
import java.util.*

@Service
class MessageService(private val db: JdbcTemplate) {
    fun findMessages(): List<Message> = db.query("select * from messages") { response, _ `->`
        Message(response.getString("id"), response.getString("text"))
    }

    fun findMessageById(id: String): Message? = db.query("select * from messages where id = ?", id) { response, _ `->`
        Message(response.getString("id"), response.getString("text"))
    }.singleOrNull()

    fun save(message: Message): Message {
        val id = message.id ?: UUID.randomUUID().toString()
        db.update(
            "insert into messages values ( ?, ? )",
            id, message.text
        )
        return message.copy(id = id)
    }
}
// MessageController.kt
package demo

import org.springframework.http.ResponseEntity
import org.springframework.web.bind.annotation.GetMapping
import org.springframework.web.bind.annotation.PathVariable
import org.springframework.web.bind.annotation.PostMapping
import org.springframework.web.bind.annotation.RequestBody
import org.springframework.web.bind.annotation.RequestMapping
import org.springframework.web.bind.annotation.RestController
import java.net.URI

@RestController
@RequestMapping("/")
class MessageController(private val service: MessageService) {
    @GetMapping
    fun listMessages() = ResponseEntity.ok(service.findMessages())

    @PostMapping
    fun post(@RequestBody message: Message): ResponseEntity<Message> {
        val savedMessage = service.save(message)
        return ResponseEntity.created(URI("/${savedMessage.id}")).body(savedMessage)
    }

    @GetMapping("/{id}")
    fun getMessage(@PathVariable id: String): ResponseEntity<Message> =
        service.findMessageById(id).toResponseEntity()

    private fun Message?.toResponseEntity(): ResponseEntity<Message> =
        this?.let { ResponseEntity.ok(it) } ?: ResponseEntity.notFound().build()
}
アプリケーションを実行する
Springアプリケーションを実行する準備ができました。
-
アプリケーションを再度実行します。
-
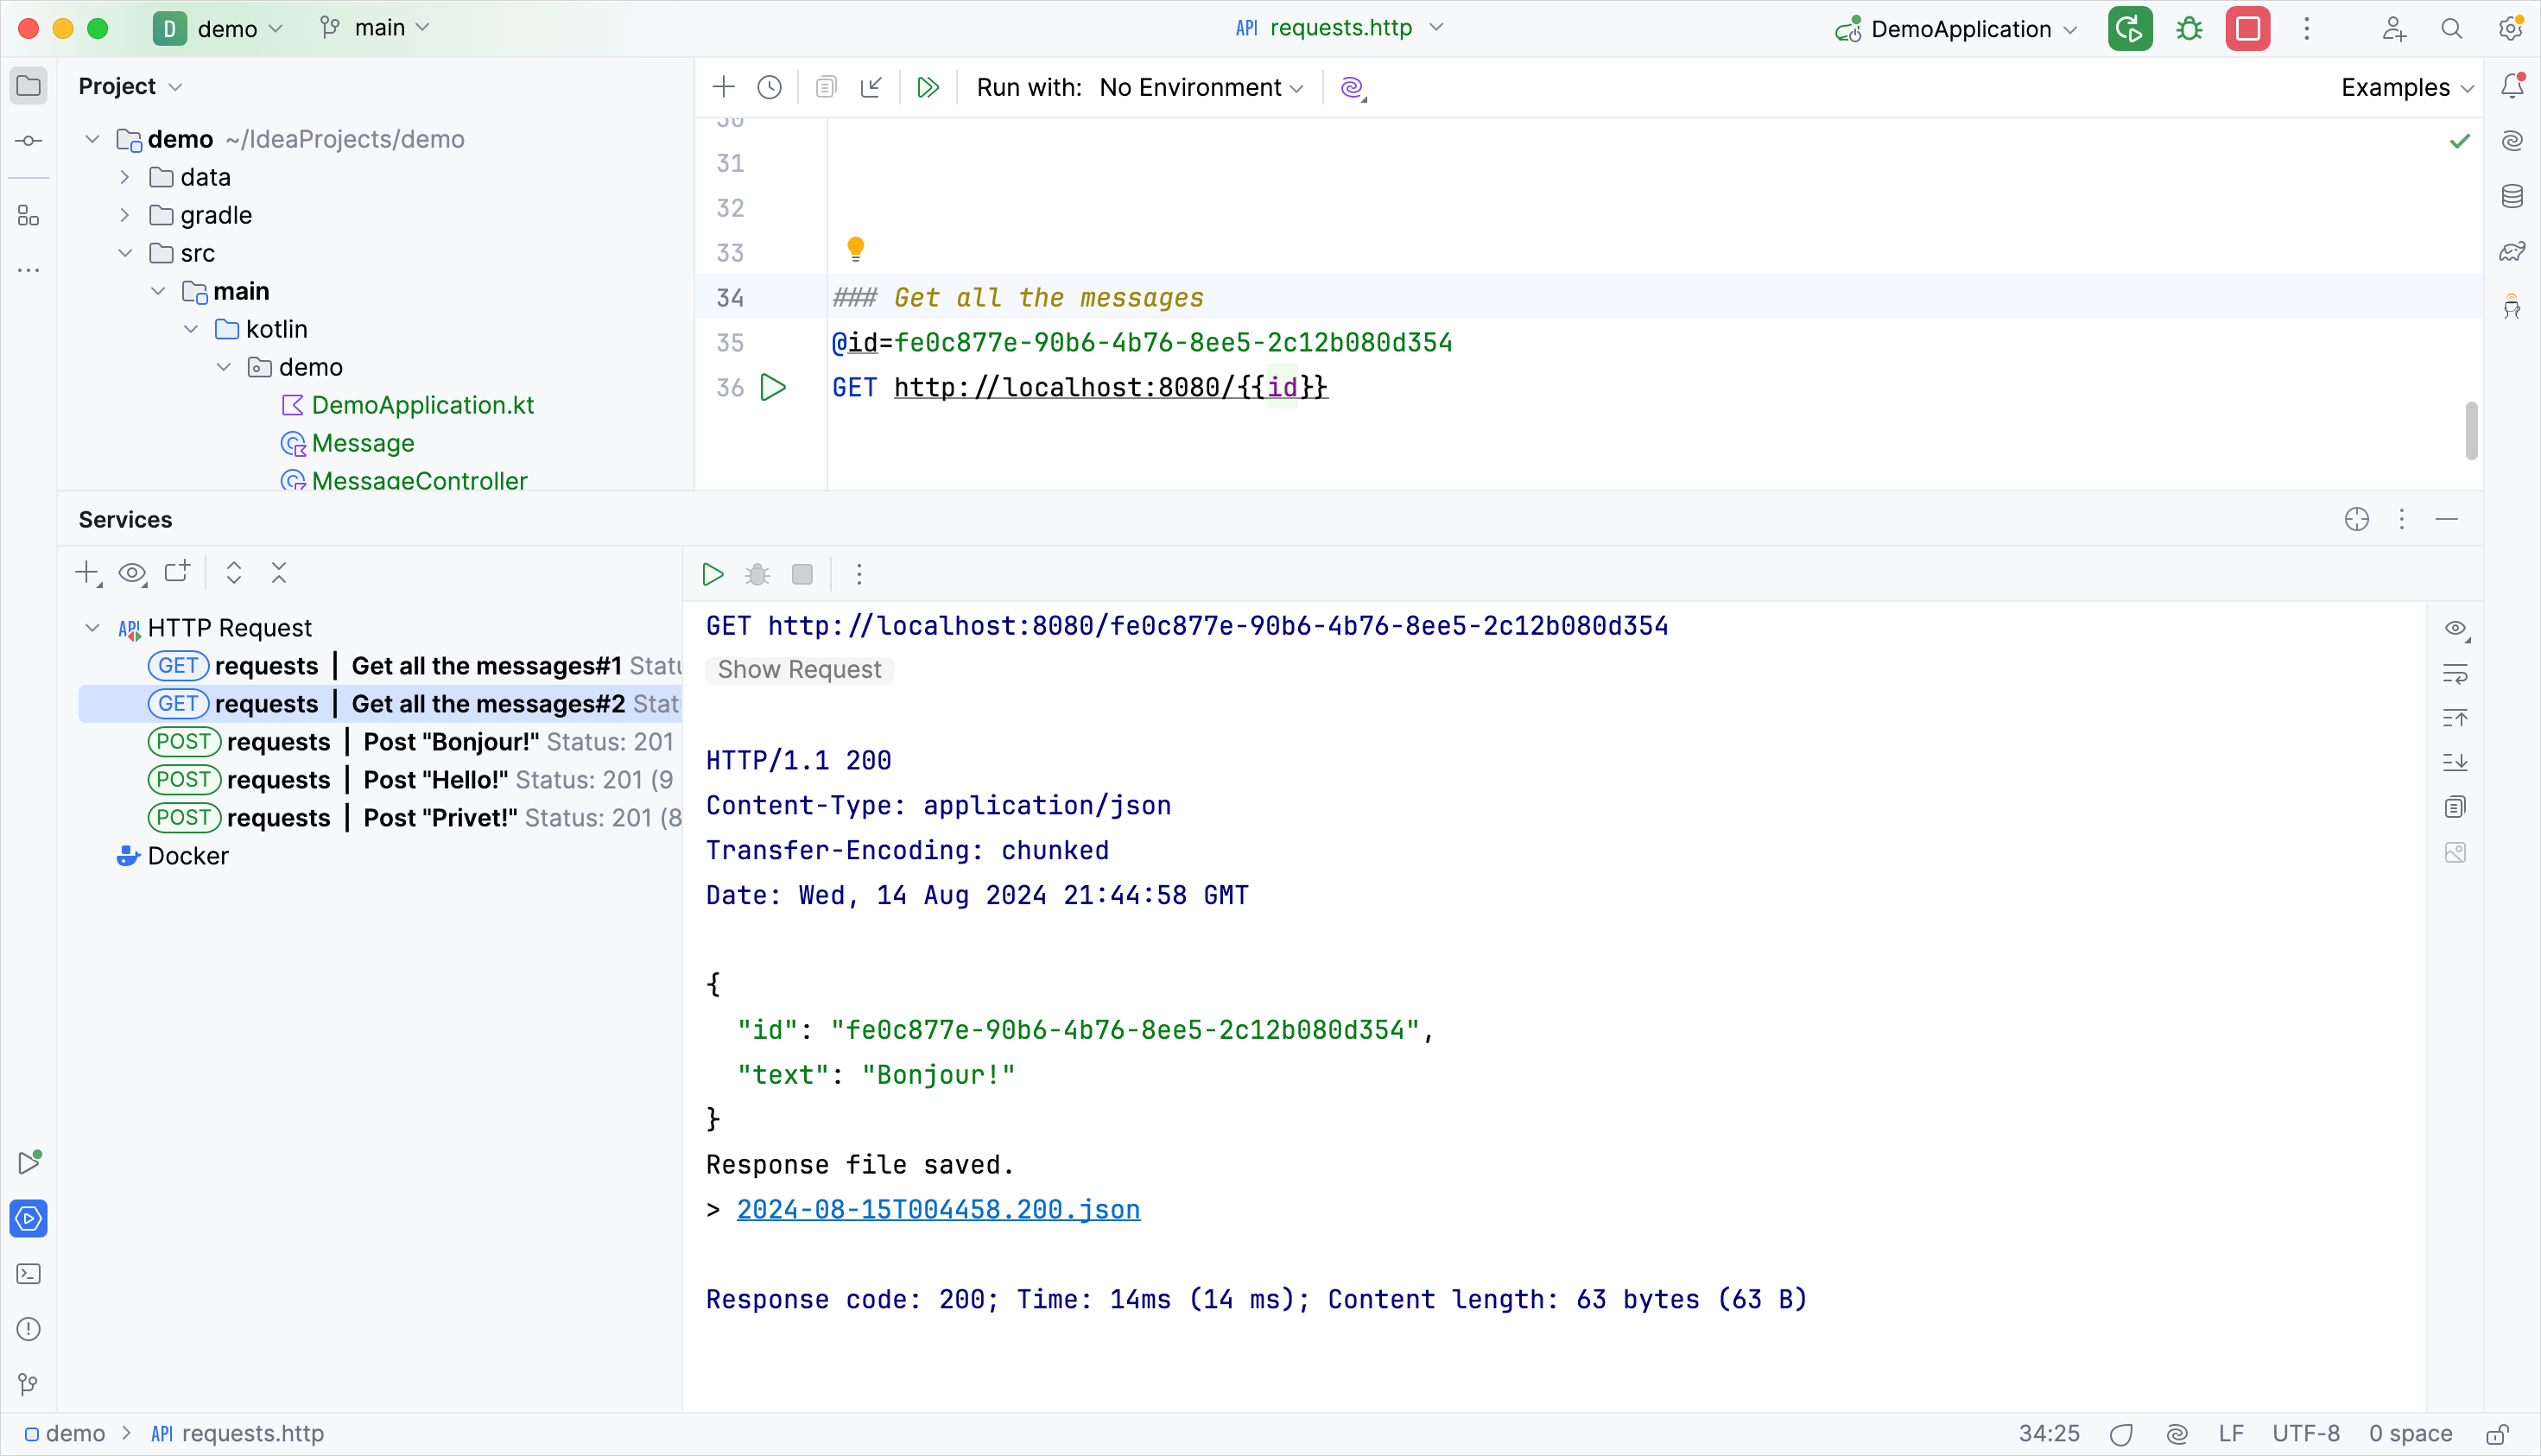
requests.httpファイルを開き、新しいGETリクエストを追加します。### Get the message by its id
GET http://localhost:8080/id -
GETリクエストを実行して、データベースからすべてのメッセージを取得します。
-
Runツールウィンドウで、IDの1つをコピーして、次のようにリクエストに追加します。
### Get the message by its id
GET http://localhost:8080/f16c1d2e-08dc-455c-abfe-68440229b84f
上記のIDの代わりに、メッセージIDを入力してください。
-
GETリクエストを実行し、Runツールウィンドウで結果を確認します。
次のステップ
最後のステップでは、Spring Dataを使用して、より一般的なデータベースへの接続を使用する方法を示します。